
Making Fire - Ferro Rods and Sparks
- Oct 21, 2016
- 4 min read

This article will take you back in time a ways. The time when mankind didn't have lighters or matches, but we understood how to take a flash of light and turn it into flame. In fact that same principle is applied every time you use a lighter to make fire. A lighter is simply a machine that was invented to simplify the spark to fire process.
First of all you need something to make a spark. Traditionally flint and steel was used, but for the purpose of this article we'll delve into Ferro rods as they are inexpensive and much easier to find than flint and steel. Most survival kits have a ferro rod included.
A ferro rod is simply a length of ferrocerium that you can use to generate sparks.
as defined on wikipedia.com:
Ferrocerium is a man-made metallic material that produces hot sparks at temperatures of about 3,000 °C (5,430 °F) when scraped against a rough surface (pyrophoricity), such as ridged steel. Because of this property it is used in many applications, such as clockwork toys, strikers for gas welding and cutting torches, so-called "flint-and-steel" or "flint spark lighter" fire-starters in emergency survival kits and cigarette lighters, as the initial ignition source for the primary fuel.[1] It is also commonly called ferro rod and most commonly of all, flint (particularly in cigarette lighters).
I always carry several fire starting tools. A windproof lighter, a standard corner store lighter, a waterproof container with strike anywhere matches and a ferro rod with striker as well as a ferro rod and magnesium block.
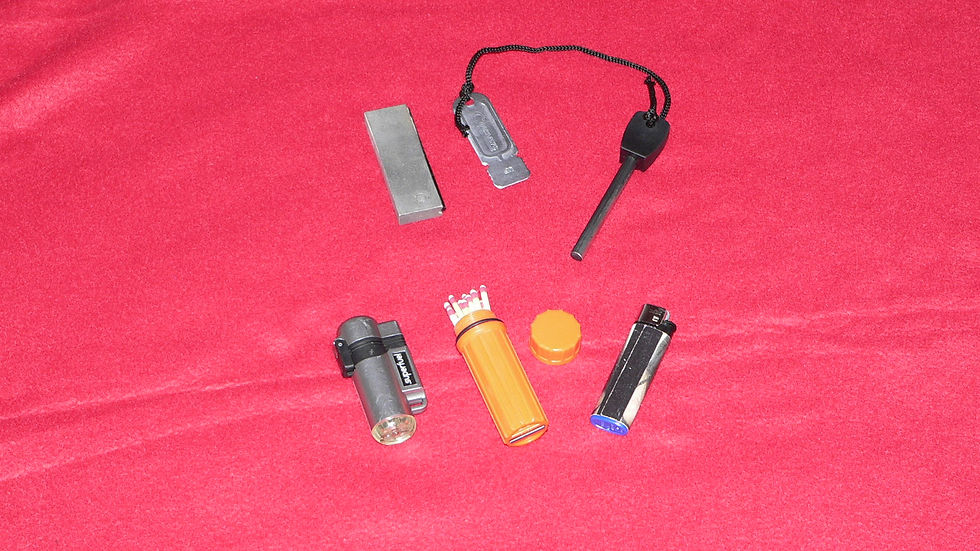
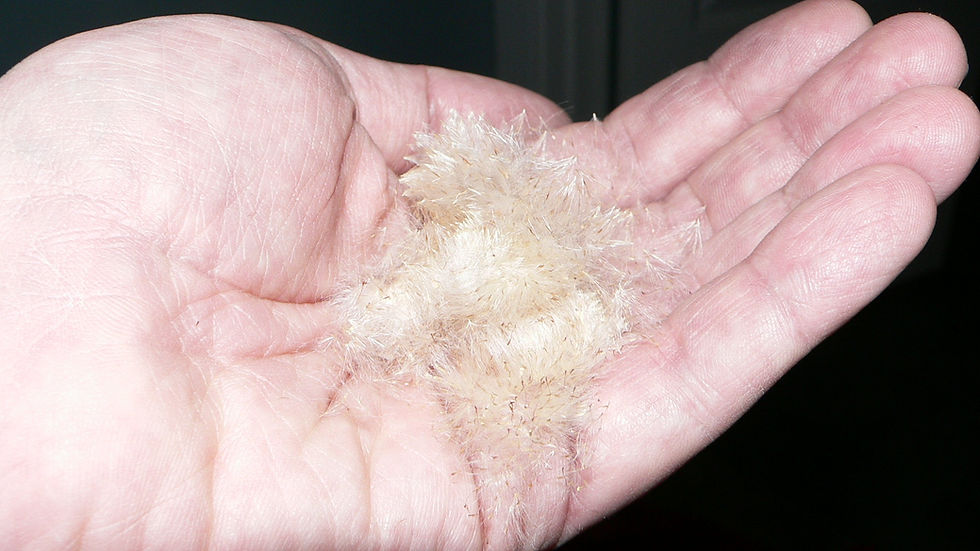
Also in my fire kit is a ziplock baggie containing dry wood shavings as well as a cattail seed head. This, to me, is the holy grail of fire starters. I a tiny pinch from the seed head will fluff out to a huge mass of very flammable material that easily catches a spark.
To get a spark you need to use a sharp edge of steel to scrape a tiny tiny piece off the ferro rod, when this piece breaks off it oxidizes and you see that chemical reaction as a spark of light, this also produces a very hot spark that can then catch and burn on a ball of fluff or other substance like char cloth or accelerant like shavings from the magnesium block.
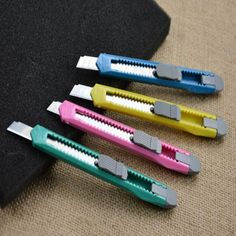
The theory is simple, strike a spark into something that will catch it, then nurse that spark into flame. Very easy in theory. But now try it in the field. This is a skill that takes practice. Try using different things to strike the spark. The striker it comes with works ok, but a sharp blade will work even better. However this will also but a nick into a sharp blade so using your wife's prized kitchen knife is not recommended if you value your life. I always have a utility razor blade with me. I have found that the back of the razor blade strikes a very big and hot spark extremely easily. You only need to have a single section of blade exposed. Always use caution when using a razor in the field, but I highly recommend adding one to your bushcrafting kit. Now you just need to watch where the spark goes. Through some trial and error you will soon be throwing sparks into your tinder nest.
First.
Gather your fire materials. kindling, split wood and sticks etc and larger pieces to sustain the fire. Get everything read before you strike that spark or you will have wasted your efforts when you don't have a ready to go fire for your tinder nest flame. Read more about setting up your fire pit here.
The tinder nest

This is the one thing that will make or break any primitive fire building that you attempt. Without a place to nurse a spark or small flame into fire, you will never get your camp fire going. To build a tinder nest or tinder bundle as some people call it you need 2 things. A wad of very dry grass or leaves. Gather about 2 handfuls of the stuff, and then rub it together between your hands to make it as fluffy as possible, breaking down some of the fibers in the material. Surface area, surface area, surface area. The more tiny bits you have to catch fire in your bundle the more heat will be generated and therefore the faster you get fire. Now form this into a bird nest like shape, keeping the material as loose and fluffy as possible. Now put the fluffiest and driest material you can find into the middle of this nest. This is where your cattail fluff or dandelion fluff or something of that nature works best. Put the nest down on a flat dry surface, out of the wind and proceed to strike sparks into the nest until you see it catch. Cattail fluff will burst into flame very quickly. pick up the nest and wrap your small flame up in the grassy material and then nurse it into a good flame. Once you have fire in your hand, put it into your ready to go fire 'teepee' and add small twigs and leaves to give it plenty of fuel. With a bit of practice you will soon be a master fire starter.
Practice before you head out.
In a safe place in your yard, like a fire pit or BBQ you can practice catching the spark and nursing it into flame safely and under stress free conditions. Practice often, under different weather conditions. Can you get a fire going in windy conditions? in the rain or snow? What materials can you add to your fire kit to help you get a fire going? Try some drier lint, it stinks, but works great.
Once you have a flame, the key to remember is to keep your air to fuel ratio high until you have a well established fire. Feather sticks, small twig, dry grasses and leaves etc.
For more details on how to construct the fire from the flame you have produced refer to my blog on that subject here
Side note:
The tinder nest is the key to starting any fire from a non flame source. A lit cigarette, a hot coal, a spark from an electrical source or even the rays of the sun magnified or reflected to create a hot spot.


Comments